Azure B2C the Manual Way
This post is part two of my Blazor Series. Part one covered the project structure and the goal of the series. You don’t need to read part one to understand this post, but it might help.
You can also watch this on YouTube if you prefer.
If you have ever built an application that requires authentication such as user login and signup, then you know what a pain it can be. Where will the user data be stored? Are we using the latest and best practices for storing this data? What happens when a user forgets their password? How do we handle MFA? Will we provide a way to use social logins? We also need UI for each of these screens.
Microsoft has provided the Identity framework to make this process easier for dotnet applications, but even that is heavily tied to Entity Framework (EF).
What if we could offload this responsibility off to a third-party service? We can create an Azure B2C tenant to do just that. Here’s how Microsoft describes B2C:
"Azure Active Directory B2C provides business-to-customer identity as a service. Your customers use their preferred social, enterprise, or local account identities to get single sign-on access to your applications and APIs.
Azure AD B2C is a customer identity access management (CIAM) solution capable of supporting millions of users and billions of authentications per day. It takes care of the scaling and safety of the authentication platform, monitoring, and automatically handling threats like denial-of-service, password spray, or brute force attacks.
Azure AD B2C is a separate service from Azure Active Directory (Azure AD). It is built on the same technology as Azure AD but for a different purpose. It allows businesses to build customer-facing applications and then allows anyone to sign up and into those applications with no restrictions on user account."
The demo solution has three different kinds of authentication needs. The first is the web app, and it can authenticate with a pretty easy flow using the MSAL library. Next, there are the native apps, and those apps are a bit more complex. Finally, we have the API project, which just needs to be able to validate tokens we send from the front end sources.
I want to show you how you can set up an Azure B2C Tenant the manual way. In a future in a future post, I plan to show you how to create a tenant automatically using some PowerShell scripts and many undocumented APIs that Microsoft has. Before you begin, you do need to go into your subscription in Azure and click Resource providers on the left-hand side. Then you need to make sure that the Azure Active Directory provider is registered. If it's not registered, you will probably run into some issues here.
Creating the Tenant
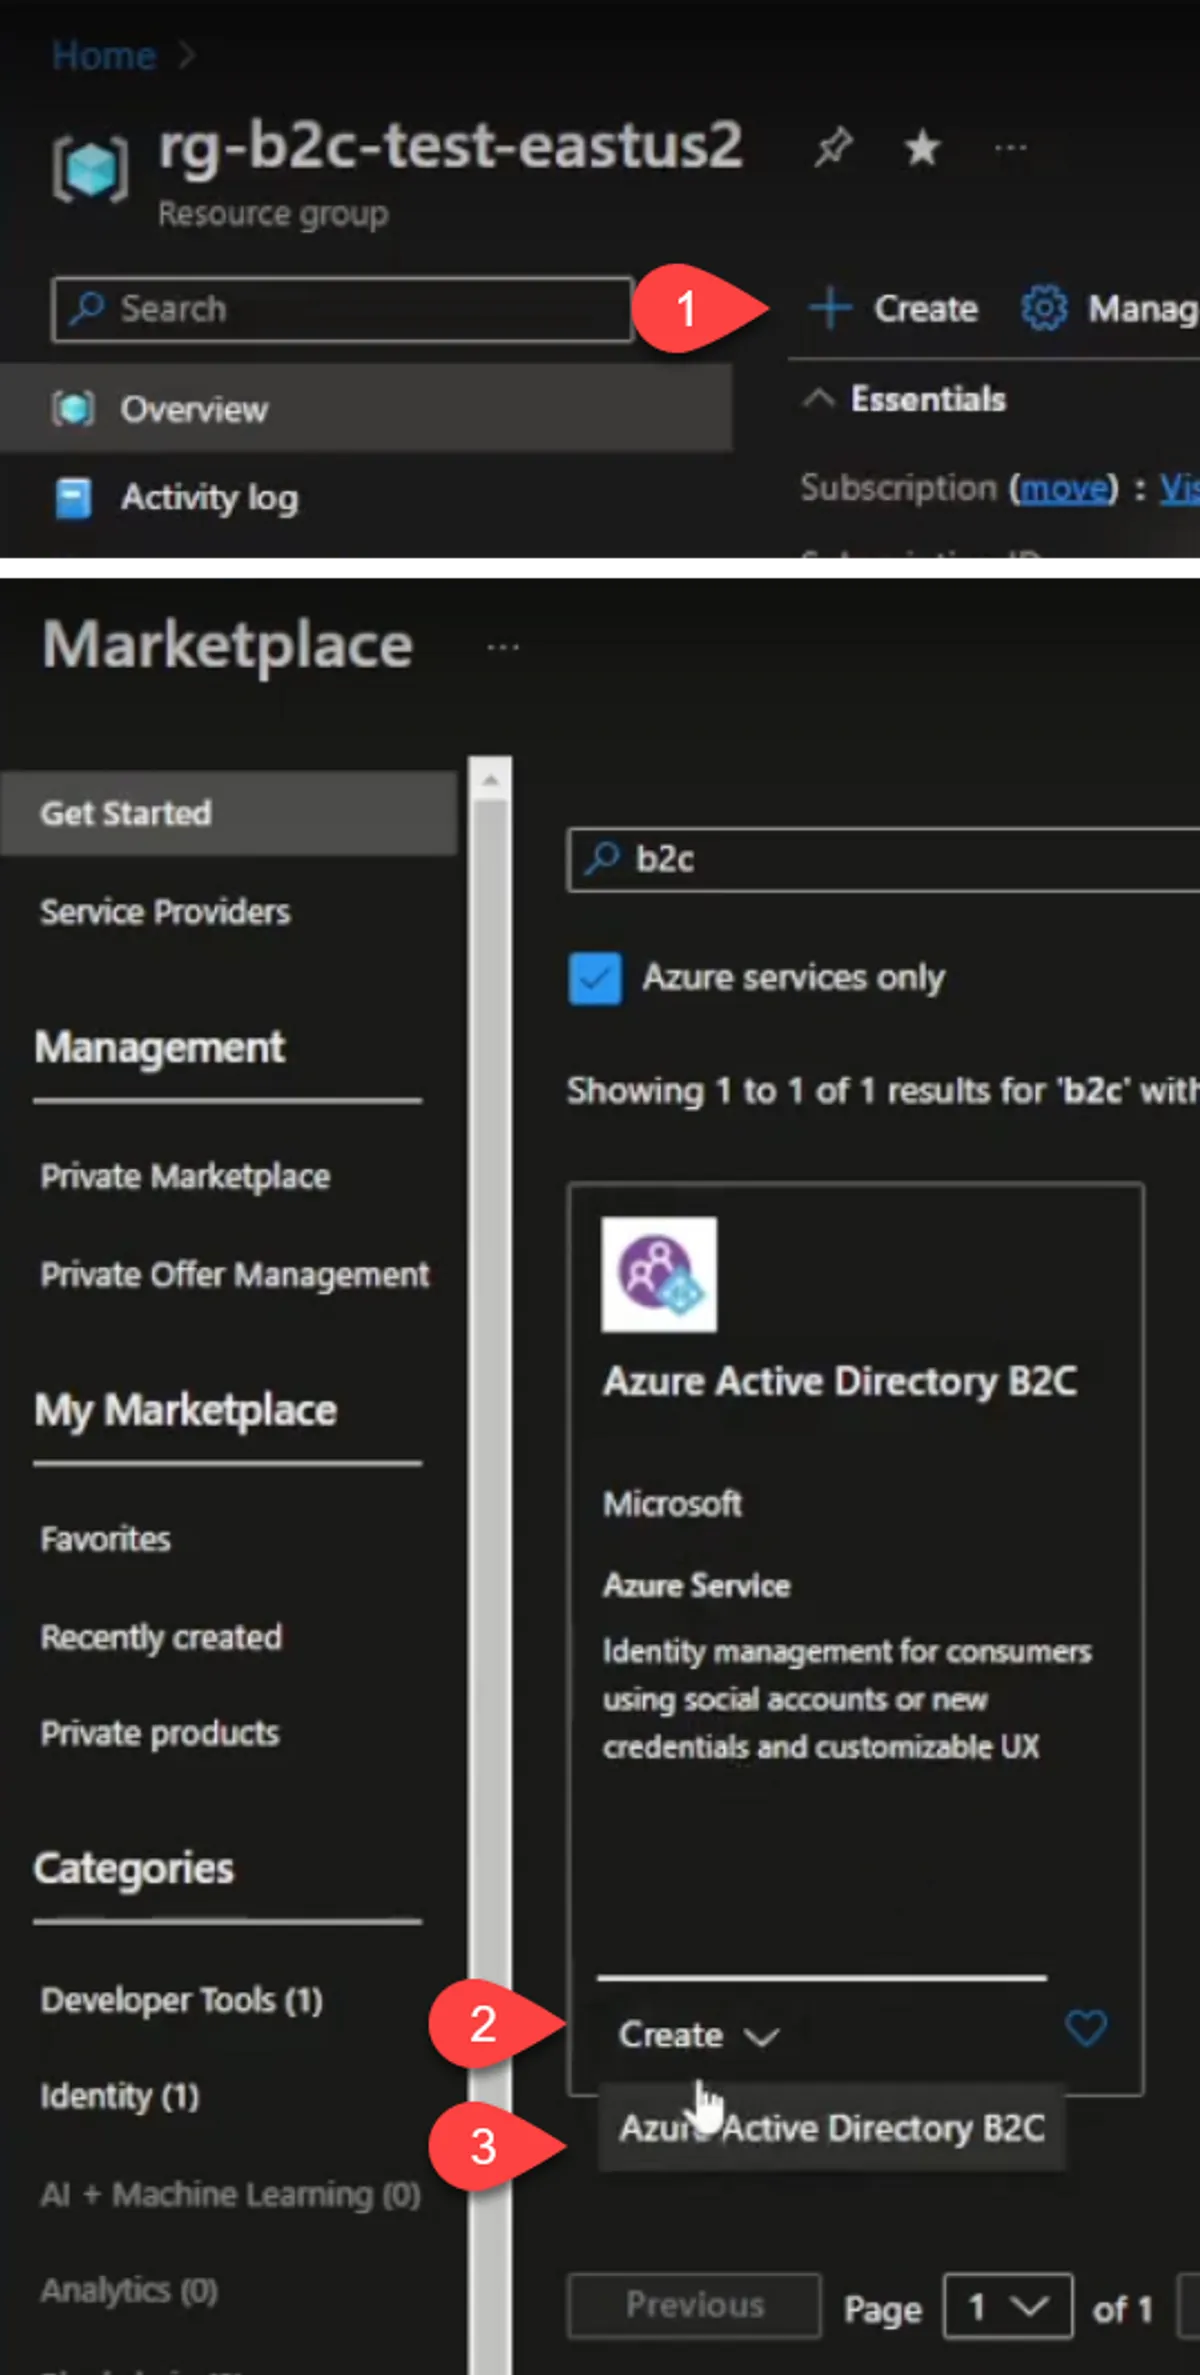
We will create a new resource and select "Azure Active Directory B2C". It will ask you if you want to create a new tenant or link to an existing tenant. We're going to create a new tenant.
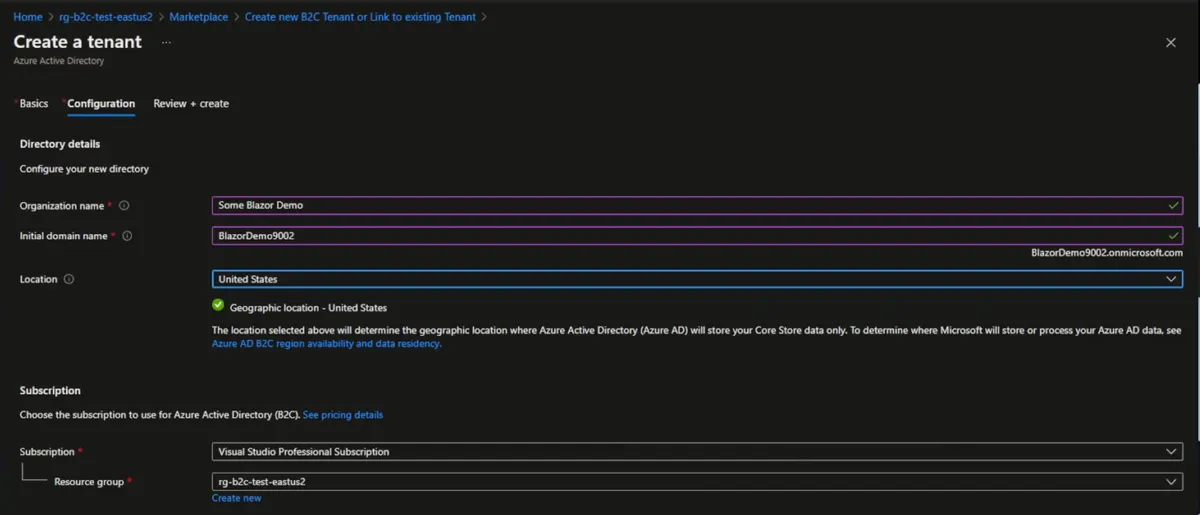
You can provide whatever you would want for the organization name, but I will use "Blazer demo" and for the initial domain name I'll call this "Blazer demo 9002". The domain will be at ".onmicrosoft.com". You can get custom domain names for your b2c tenants, but it does require an Azure Front Door. That has a monthly cost regardless of whether you actually use it or not. We'll select the subscription and the resource group where we want it to go.
You do have to select a location, and this is different from your normal Azure resource locations. There are only a handful of places where this is the b2c tenant is allowed, and so we'll just leave it as the United States.
Once that's finished and the Tenant is created, we can go into it. I’m going to go through basically most of the things on the left panel and show you how to set this up for the demo app that's part of this blog Series.
First step, we've got app registration. These app registrations will allow us to use MSAL as part of our authentication mechanism. If you're using the old ADL libraries, Microsoft has deprecated that, so you should be using the MSAL libraries instead.
Creating the API App Registration
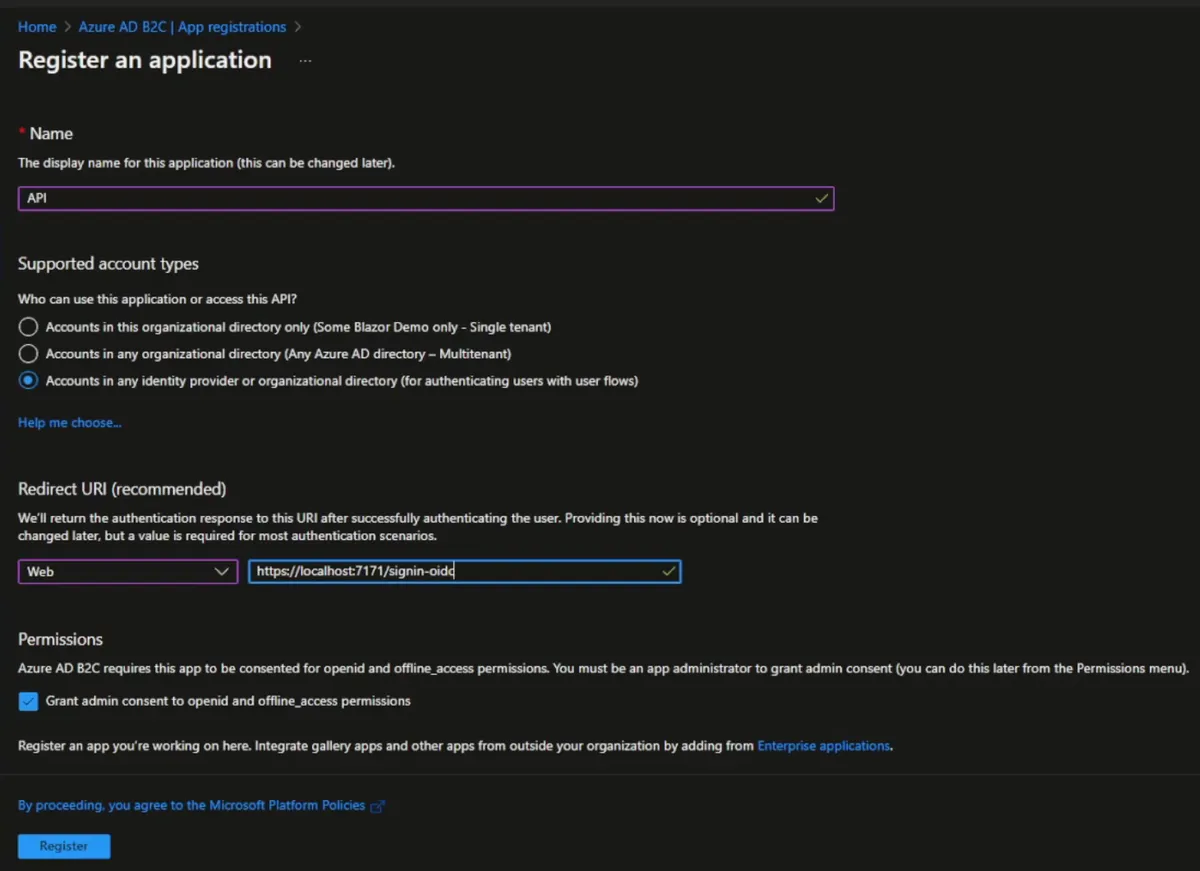
The first one we're going to do is the API project. The order of these registrations doesn't matter a lot, but we will want to reference the API project’s scope in the web project and the native project. We'll just call this app "API". Make sure "Accounts in any identity provider or organizational directory" is selected. Selected "Web" as the platform. Let’s take a look at our demo project. In our sample project, we can open the launch settings (under properties) for the API project, and you can see that our application URL is https://localhost:7171. That’s what we’ll use in the App Registration redirect URI. We also need to add "/signin-oidc". Click Register.

With that set up, the next thing we need to do is look at is "Expose API". First, we're going to add an Application ID URI. I set this to something friendly and call it "api" instead of the generated GUID. That URI will be where our scopes are available from.
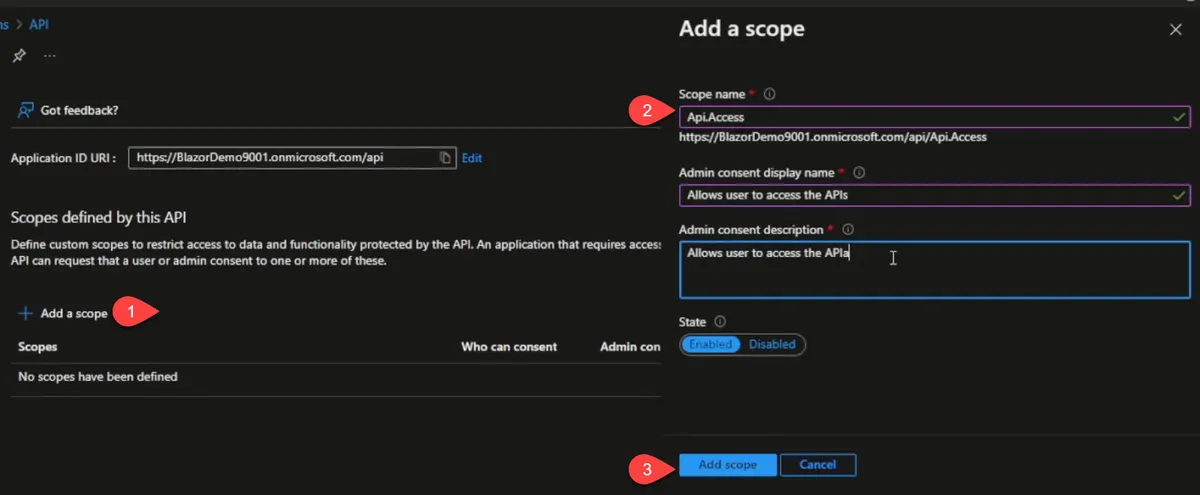
Let's call it "API.Access"
You can see that the scope is "[tenant].onmicrosoft.com/api/Api.Access"
With that done, we'll create a web application.
Creating the Web App Registration
The initial setup is the same as the API app. One exception is the Redirect URI.
Since we are using Blazor, we need to select Single Page Application. For the URI, we will provide "https://localhost:5183/authentication/login-callback". Obviously, you would want to change the hostname and port number for your own app.
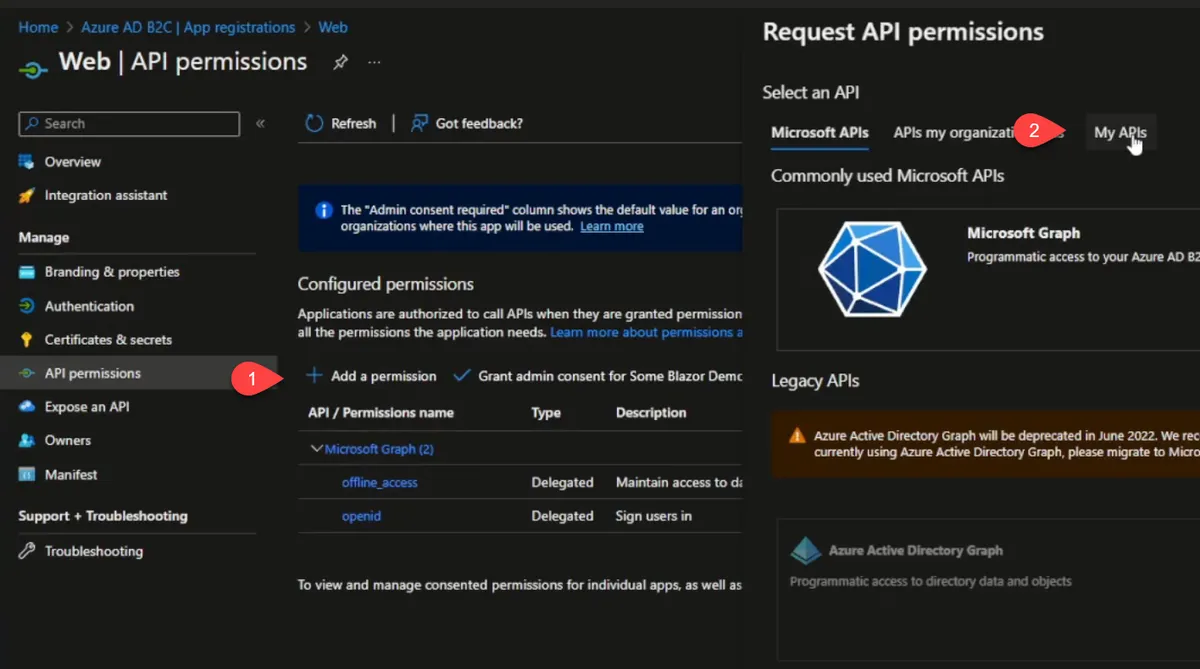
Next, we will go to API Permissions, select "Add a permission", My APIs, select the API app we created earlier.
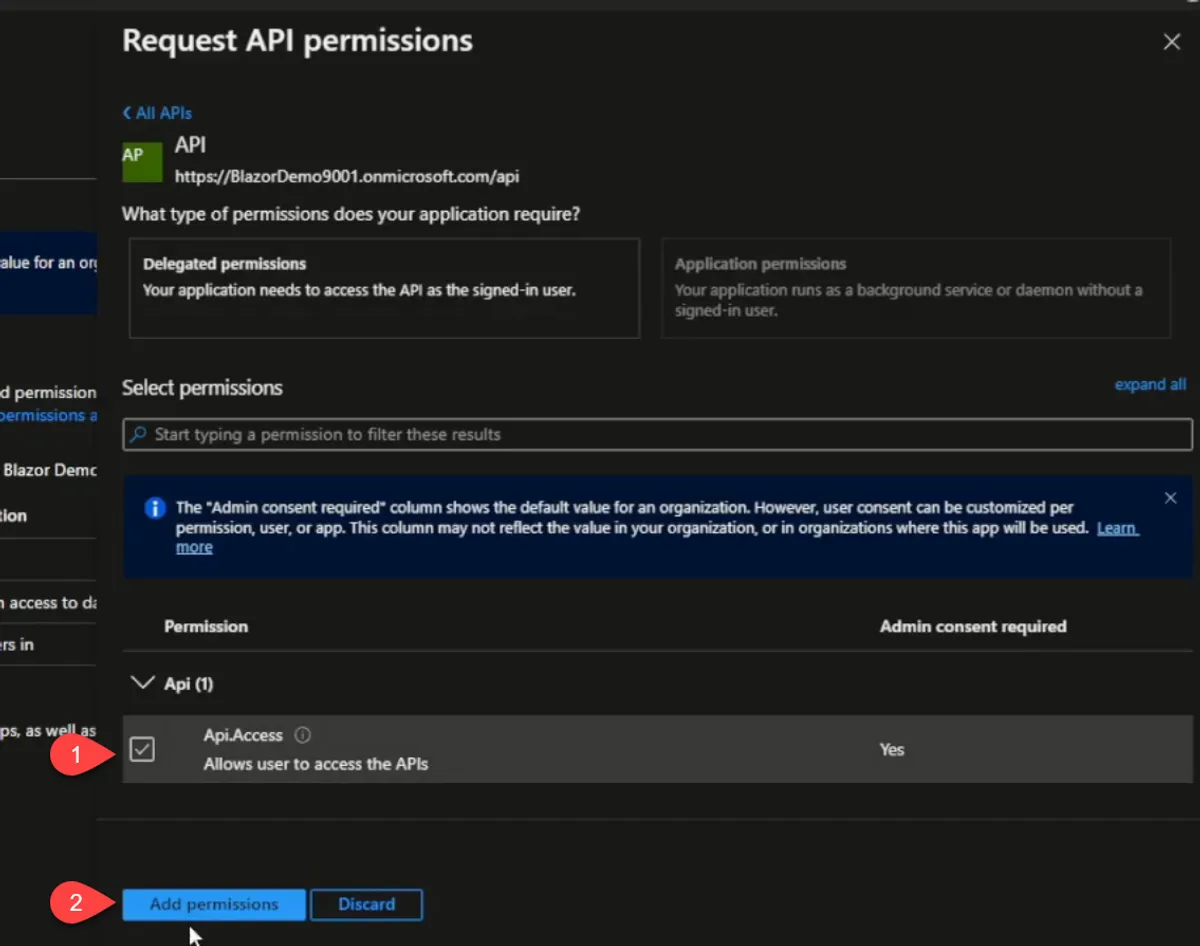
Finally, check the scope. I also click "Grant admin consent for [tenant name]" which will grant the API scope on behalf of the whole tenant.
Creating the Native App Registration
We will also create a new App Registration for our native apps. This will be for the WPF and MAUI app.
For the Redirect URIs, select "Public client/native" and enter "https://[tenant].b2clogin.com/oauth2/nativeclient" and click Create.
Once created, go to Authentication and select the second URI that should be something like "msal{GUID}://auth". The GUID will be the same as the Client ID for the app.
Like the Web app, we will also add the API Permission scope of our API project and grant consent.
Creating an App Registration for a Microsoft social sign in
These are the primary app registrations that we need for making our application run, but I want to add a Microsoft Identity Provider next. This will allow users to sign in with their Microsoft account. To achieve that, we need an additional app registration.
If you don't care about users signing in with the Microsoft account, then you can skip this step.
We will create a new registration just as before and call it "MS Account". You can get the Redirect URI from going to the Identity Provider screen, select "Microsoft Account". It looks like this: https://[tenant].b2clogin.com/[tenant].onmicrosoft.com/oauth2/authresp.
We also need a client secret as part of the Identity Provider. We can get this by going to "Certificates & secrets" and creating a new secret. You can set the description and expiration length to whatever you want. You will want to have some process or reminder to cycle this and update the Provider when the time comes. When you create the secret, you will need to copy it somewhere, so we can use it later.
Creating Identity Providers
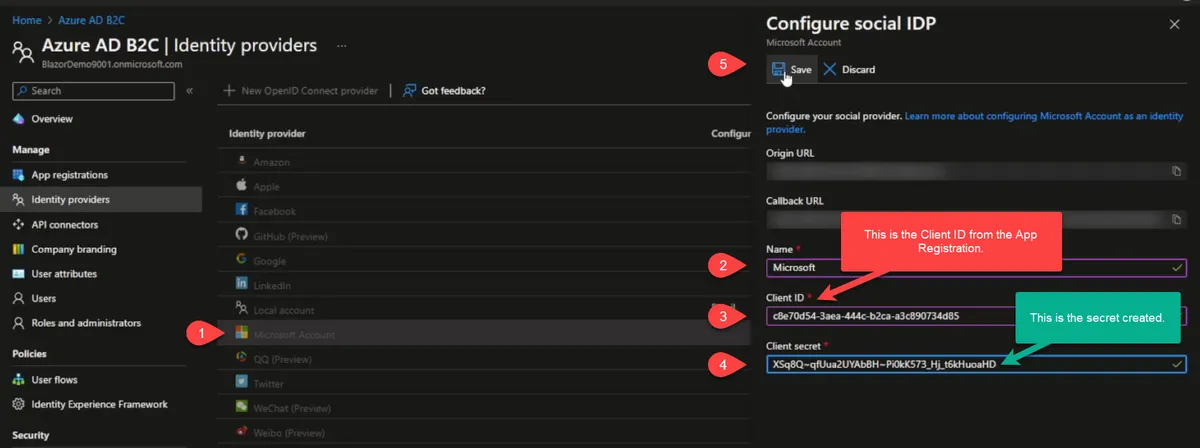
Next step, we've got identity providers. By default, the local account is enabled. This would be where you could configure any of these social providers, or you could add a custom open ID provider. We will set up a Microsoft account as an identity provider. The process is very similar to the rest of the providers, the only difference is that the identity provider for the Microsoft account is the app reg we set up previously.
Each provider has a link with documentation on how to get a Client ID and secret.
The name of the provider is public facing. For the Microsoft provider, we’re going to use the Client ID from the app registration we created previously and the "Client secret" is the secret we created.
API Connectors

Next, we have API connectors. API connectors allow us to add our own application as part of the B2C process.
Create an API connector, and we will call this "Claims". The endpoint URL needs to be something that Azure B2C can call as part of the flow and needs to be publicly accessible. To test locally, you either need to set up something like ngrok or do some port forwarding on your router. You could also use an Azure Function. I just used a domain that I have and set up some port forwarding on my router.
You can sign up for a free account ngrok account. The only problem with that is that every time you start that up, your domain name changes, which means you have to come back here and change this endpoint URL.
Of the authentication type, I really wish that it supported accessing a Key Vault. There's two only two options presently and one of them is basic and one of them is a certificate. "Basic" is just what it says, username, password. The API connector will provide this to the endpoint with the request body. I will probably set up some kind of schedule that rotates the password in a Key Vault secret and then update this value so that my application and connector are in sync.
User attributes
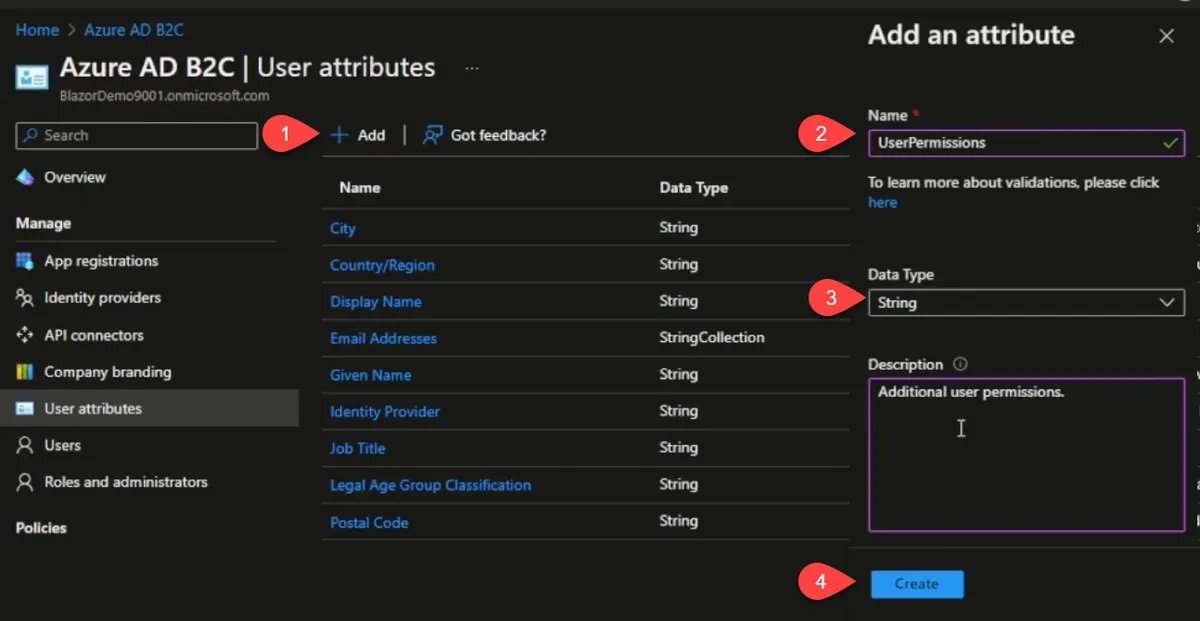
Next we have user attributes. We're going to add a user attribute and call it "UserPermissions"
A word of caution. The data type and the name are both immutable, which means once you hit create, you cannot change either of the these two properties. You can change the description later if you need to. Make sure you have that set up correctly because once you create it, it's set in stone and if you delete it, it will remove all the data relating to this attribute. If this was something that we were going to collect from the user like what's your favorite car or sports team or something all along those lines, if we delete this attribute, all of that information that we've stored in that attribute will be gone.
User Flows
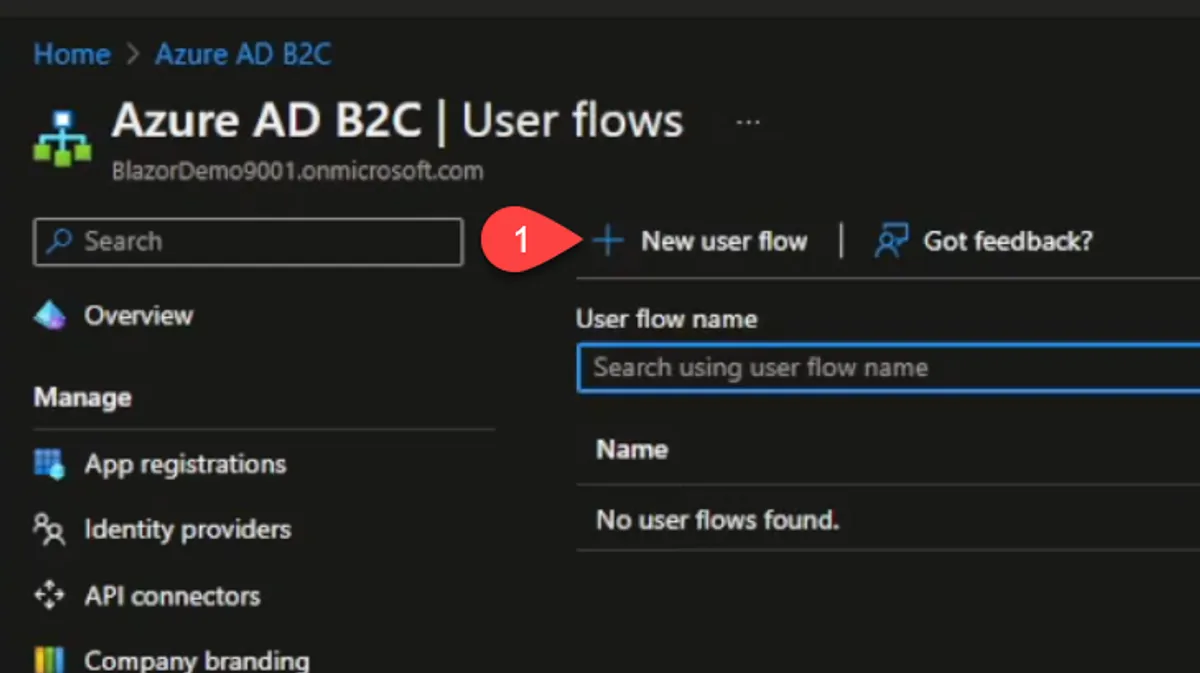
Next are user flows. This is the main purpose here. We will create a new user flow and select "Sign up and sign in". For the name, I will provide "signup_in".
We want people to be able to log in with emails, but if you don't want that you can say none. Since we have the identity provider set up we'll check that as well.
For multifactor authentication (MFA), personally, TOTP is the only valid type of multifactor authentication among these options. SMS and email are not secure. TOTP requires that you scan a barcode, which I'm sure you've used that before.
The MFA enforcement means that if you set it to always on any user who's got the MFA setup will be required to use it. With conditional enforcement, Azure attempts to try to decide whether the user's login is normal or not. Which means if the user primarily logs in in the United States, and suddenly, they're attempting to log in from Germany, the conditional access will kick on and will require a multifactor authentication and so it just looks at some of the risk levels involved in that user's particular sign-in attempt.
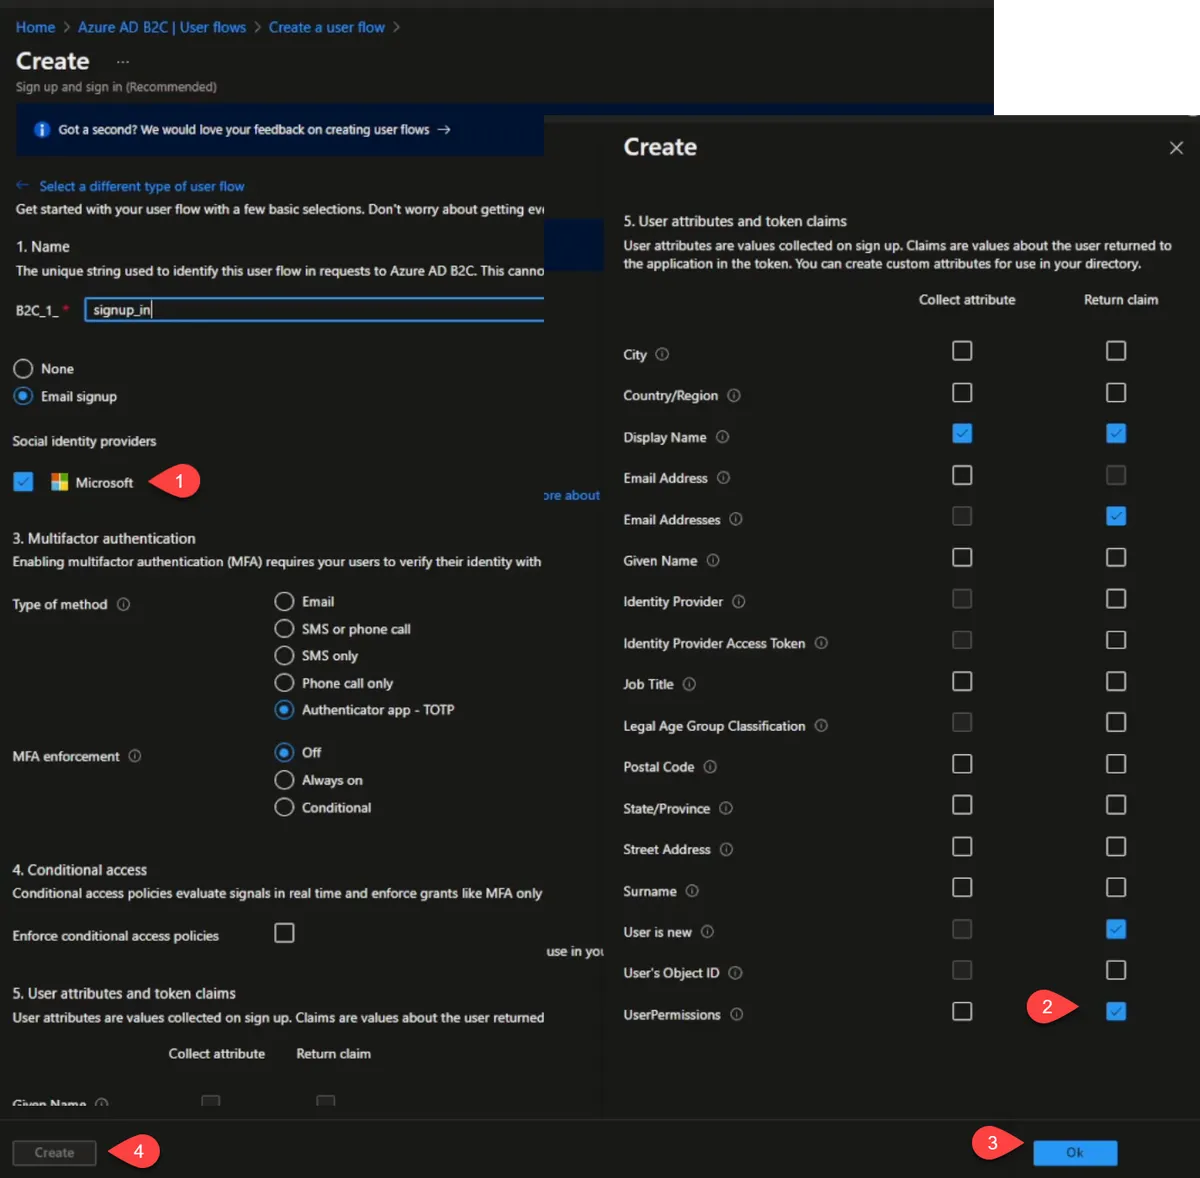
We can select additional attributes that we want to collect about the user. Email, if they're a new user, and we want the user permissions attributes to be returned with the token as part of our flow.
We also have the option to collect attributes from the user. The user will get prompted for this during sign up. We will collect the Display Name and set it to return with the claim.
Finally, we’ll click Create. We can then click on the flow to modify it. You will see on the left blade that there are "User Attributes" and "Application Claims". The difference between these two sections are that items checked under "User Attributes" will be collected during the signup flow.
API Connectors (User Flow)
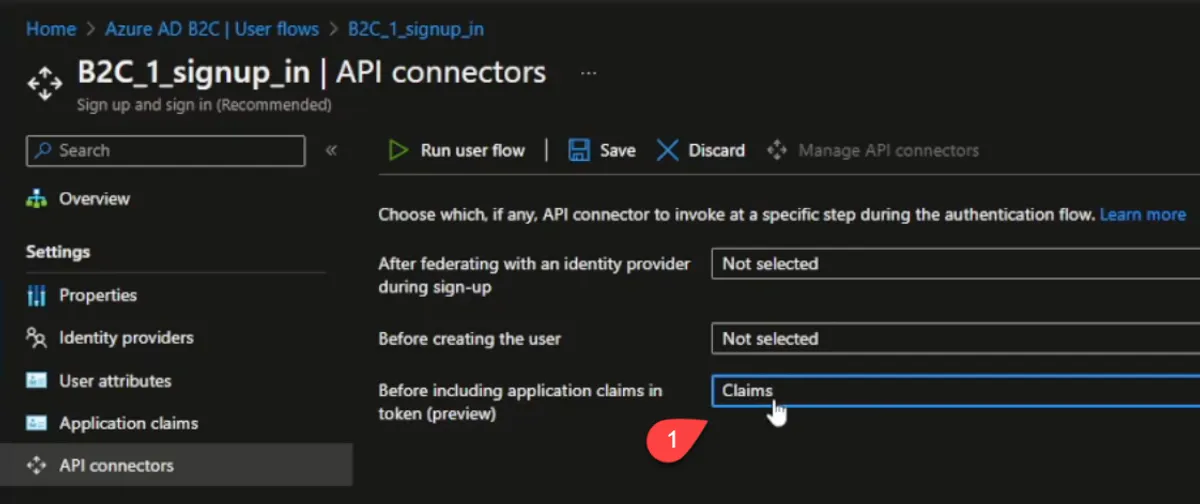
In API Connectors, we're going to set "Before including application claims in the token" to "Claims". This is the connector we set up previously. With this set, the user flow will call our API connector, and we can validate the user and set any custom attributes we want like user roles, etc.
Page Layouts
Finally, we have page layouts. This is where you could customize what your flow looks like. Currently, the default layouts use a very outdated Bootstrap 3 styles. You can modify this by creating a publicly facing location for your own custom template and styles. It’s a bit more involved than I want to get into for this already lengthy post.
Final Notes
My final notes for the user flows is that if you would like to test out how your flows work, I’d suggest adding "https://jwt.ms" to your redirect URIs in the Web App Registration. When you click "Run user flow" you can specify this as your callback URL. This site is run by Microsoft and will decode the token that your application would get. It allows you to see clams and attributes that your application will receive.
Updating Our Applications
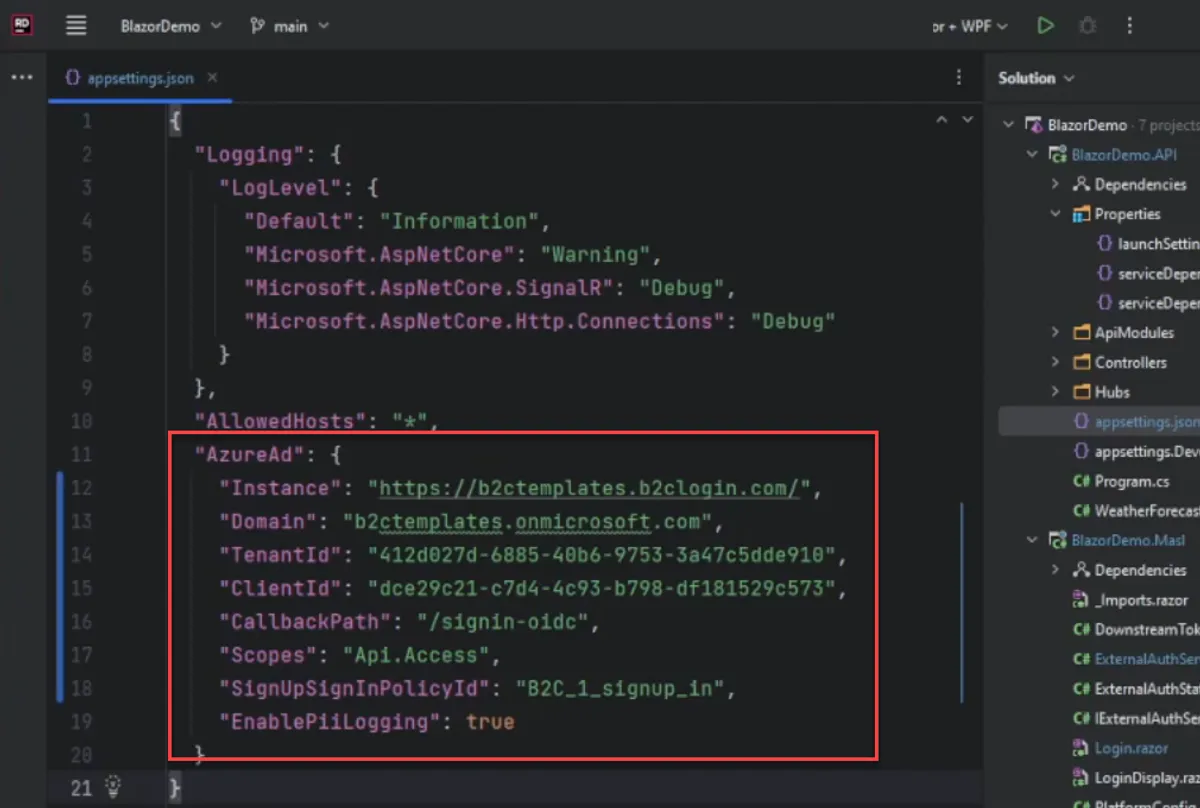
Our tenant is now set up. All that’s left is to update our appsettings.json file for each of our projects. For each application, we will copy the Client ID, the Tenant ID, and the Tenant Name from the portal and modify the AzureAD section. You can watch the YouTube video that I did or look at the project on GitHub to get more details on that.
Conclusion
I think that's it. In the next post, I’m going to show how to do this all automatically. You can see that that was quite a bit of work to set these up. If you have multiple environments where you want to separate your test users from your real users, that's a lot of things to go through.