Azure Self-hosted Container Agent
Self-hosted Azure DevOps (ADO) agents are a great choice for teams seeking tailored build environments and greater control over their CI/CD processes. These agents make it easy to customize capabilities, allowing for the installation of specific software and the use of machine-level caches, which significantly enhance performance. They also offer cost efficiency by optimizing the use of existing infrastructure and resources.
Self-hosted agents allow more robust security, ensuring sensitive code and data are securely managed within a private network. You can easily deploy additional self-hosted agents, which means you can adapt to the changing demands of development pipelines.
I would like to explore how to set up an Azure Container Registry (ACR), build and deploy an Azure Container Instance (ACI) that will house an Azure DevOps self-hosted agent.
ACR
I should note that an ACR isn’t strictly required, you could host your image on Docker Hub or GitHub, however if you want private images, you’ll need an ACR.
The first thing we’re going to want is to deploy the ACR. Here is a bicep module that I’m using for this example. You’ll probably want to check on some additional security features and use a Premium SKU, but I’ll leave that up to you.
param location string = resourceGroup().location
param registryName string

resource registry 'Microsoft.ContainerRegistry/registries@2023-01-01-preview' = {
name: registryName
location: location
sku: {
name: 'Basic'
}
identity: {
type: 'SystemAssigned'
}
properties: {
adminUserEnabled: false
policies: {
quarantinePolicy: {
status: 'disabled'
}
trustPolicy: {
type: 'Notary'
status: 'disabled'
}
retentionPolicy: {
days: 7
status: 'disabled'
}
exportPolicy: {
status: 'enabled'
}
}
encryption: {
status: 'disabled'
}
dataEndpointEnabled: false
publicNetworkAccess: 'enabled'
zoneRedundancy: 'Disabled'
}
}
We can deploy this with a simple ARM template deployment task using either the classic UI pipelines, or a YAML pipeline.
trigger: none

pool:
vmImage: ubuntu-latest

steps:
- task: AzureResourceManagerTemplateDeployment@3
inputs:
deploymentScope: 'Resource Group'
azureResourceManagerConnection: '[REPLACE ME]'
subscriptionId: '[REPLACE ME]'
action: 'Create Or Update Resource Group'
resourceGroupName: 'rg-[REPLACE ME]'
location: '[REPLACE ME]'
templateLocation: 'Linked artifact'
csmFile: 'container-agents/registries.bicep'
overrideParameters: '-registryName [REPLACE ME]'
deploymentMode: 'Incremental'
You can find the complete pipeline on my GitHub page. The important part for this example is to provide a value for the registryName parameter. In YAML, we can do that with overrideParameters: '-registryName [REPLACE ME]'
Once that is deployed, we can prepare to deploy our image.
DevOps
Agent Pool
The agent needs to be associated with an Agent Pool in ADO. You can find your pools under the organization settings or project settings. Add a new pool, set the pool type to “Self-hosted” and name it whatever you want.
Personal Access Token (PAT)
The agent needs a PAT to establish the initial connection to your ADO instances. You can create this from the User Settings icon to the left of your account image. Once generated, keep the token in a text editor temporarily until you can store it in the pipeline variables.
Creating a service connection
I am going to create a service connection in ADO. There are probably other ways to accomplish this. I, personally, don't like creating a service connection to use the Docker tasks. The service connections only exist in one project, which means if you want to use the same ACR across multiple projects, you must replicate this process. That, in turn, creates additional Service Principals (SP) in Azure. There isn't an option to use an existing SP, either. You could probably use a CLI task instead of the Docker task. If you know of a better way, please let me know.

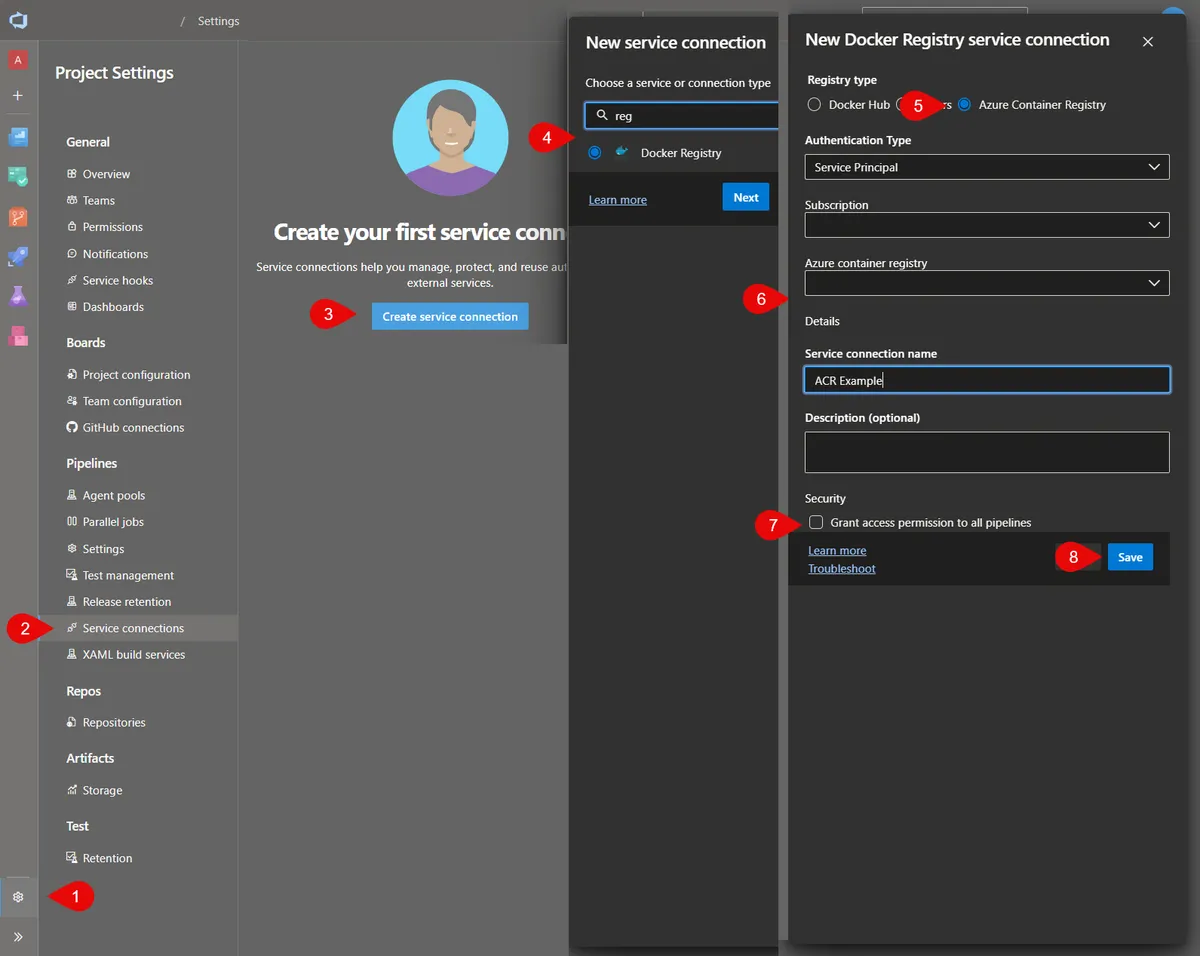
To create the service connection:
- Go to Project Settings.
- Click Service connections
- Click Create service connection or New service connection.
- Search for “registry”, select Docker Registry, click Next
- Select Azure Container Registry.
- Select Service Principal from the Authenticate Type and select the rest of the details as required.
- You can optionally grant access to all pipelines. If you don't, you will have to grant access to each pipeline.
- Click Save
Role permissions
Back in Azure, go to the ACR and using the Access control (IAM) you will need to give AcrPush to the service connection account if it didn't already do that for you.
You may want to give your ADO to Azure service principal that role as well. You will need to give this same SP the AcrPull role.
Building the Container
My GitHub repo has an example Ubuntu 22 container file that you can use as a starter. I would highly recommend you include in your container are PowerShell, the AZ CLI, Bicep CLI. Optionally I would include Podman (or similar), terraform, and the dotnet SDK depending on your needs. The agents need a script file. I've included that with my files, or you can download it directly, following the steps listed out here . The script downloads the necessary files and bootstraps the agent, which will then connect to your ADO instance.
You should test the image locally first. If you can, use Docker Desktop or Podman and run the container to make sure it doesn't have any bugs and has all the software you need. I can't tell you how much time I've wasted pushing an image to the ACR only to find that something was wrong with it. You can add the environment variables, that I'll point out below, connect and run jobs from your local instance.
There's also a Windows container . You do need a Windows machine to build Windows-based containers, but it can be done.
Pushing the image
The next step is to push the image to the registry. Note, there is a complete pipeline in the repo; however, you can't run the Docker tasks without the service connection. You will probably need two different pipelines. One that deploys the ACR, and the other to build/push the image and deploy the container.
Here's the step we will add. Note that the containerRegistry setting is the service connection we created previously.
  - task: Docker@2
    inputs:
        containerRegistry: 'ACR Example'
        repository: 'linux-agents'
        command: 'buildAndPush'
        Dockerfile: 'container-agents/linux/dockerfile'
        tags: 'latest'
Run the pipeline and verify that the image has pushed successfully.
Deploying the Container Instance
With the image in place, we can finally deploy the container instance. Let's take a look at my bicep modules.
Agent
This is our resource-specific module . This module hard-codes a number of values that I don't want to change, like the registry and image name. I prefer fewer dynamic and magic strings when possible. I would expect to have multiple files like this one for each environment or app and named as ci-agent-linux-stage.bicep or similar. The agent.bicep file then uses main.bicep.
Make any changes you need to, like the agent name, image name, the registry name and the agent pool name.
Main
Here we zoom out one step. This file takes all the parameters from the specific resource view and is a common reference for all of our agent files. Creating this module makes it easy to specify some additional details like the environment variables and credentials for the ACR. The Azure agent script will remove the AZP_Token from the environment variables once the connection is made and the PAT is no longer needed.
Container Group
Finally, we have the containerGroups.bicep module . This is a module that I would use for an ACI. You can modify any additional security or add a vnet/subnet details you need here.
Deploying
Now let's go back to the deployment script. Here's what the final step looks like:
  - task: AzureResourceManagerTemplateDeployment@3
    inputs:
        deploymentScope: 'Resource Group'
        azureResourceManagerConnection: '[REPLACE ME]'
        subscriptionId: '[REPLACE ME]'
        action: 'Create Or Update Resource Group'
        resourceGroupName: 'rg-[REPLACE ME]'
        location: '[REPLACE ME]'
        templateLocation: 'Linked artifact'
        csmFile: 'container-agents/ci-agent-linux-dev.bicep'
        overrideParameters: '-registryUser $servicePrincipalId -registryPassword $servicePrincipalKey -token $pat'
        deploymentMode: 'Incremental'
        addSpnToEnvironment: true
There are a couple of important settings here.
First, addSpnToEnvironment: true makes the service principal available to the context of this task. From the UI, you can find this under Advanced ⇾ Access service principal details in override parameters. In a previous step, we added ArcPull to our ADO service connection principal. The setting hint reveals that we can use $servicePrincipalId and $servicePrincipalKey in our task parameters.
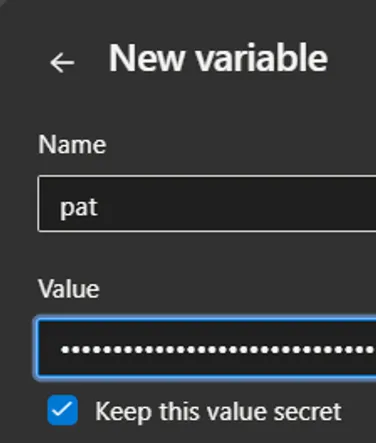
We can then set our parameters as such overrideParameters: '-registryUser $servicePrincipalId -registryPassword $servicePrincipalKey -token $pat'. Be sure to create a secure variable called pat and populate it with the PAT we created previously.

Run the pipeline and verify that a container instance has been created. It may take some minutes for the deployment to complete and several minutes after that for the agent to be ready to use.
If all is well, you can look at the agent pool that you provide in the agent bicep file and check if it's online.
Using the agent pool
From here on out, you can use the pool to run your pipelines using the ACI. Something that I have found is that the listed capabilities for an agent may not display everything that you installed. This was particularly true for Linux agents. You may have to adjust your image to include environment variables or path variables for some tasks to run successfully.
I hope this has been helpful to you and as always, I welcome your comments and questions.